
1. 前言
好久没有写文章了,结合之前分享的资料,今天介绍一下 React 中的 高阶组件
2. 什么是高阶组件
什么是 高阶组件 (Higher-Order-Component) , 说人话其实就是 组件外面在包一个组件,用伪代码表示
1 | const 三明治 = 用刀切(面包(火腿), { |
用面包包裹 火腿 然后用 刀切一下,变成了一个三明治,而三明治 就是最终生成的组件
3. 从高阶函数开始了解
在函数式编程里面,函数作为一等公民,函数可以作为返回值, 也可以作为参数
1 | const add = (a) => (b) => a + b; |
这里的柯里化函数 add 接受一个值 a 然后返回一个新的函数,新的函数同样接受一个值 b, 最终 返回 a +b 的和,
理解了这点 之后 可以看出 所谓的 高阶组件 和 高阶函数 是一回事
4. 作用与基本原则 ?
作用
- 代码复用
- props 更改与组合
- 渲染劫持 通过判断条件决定渲染内容
- 装逼
基本原则
- props 保持一致 : 在原有 props 上面添加一些新功能 尽量不让其受影响
- 可以任意灵活组合 : 多个高阶组件 可以组合在一起
- 给组件添加一个静态的 displayName: 方便调试
5. 实际例子
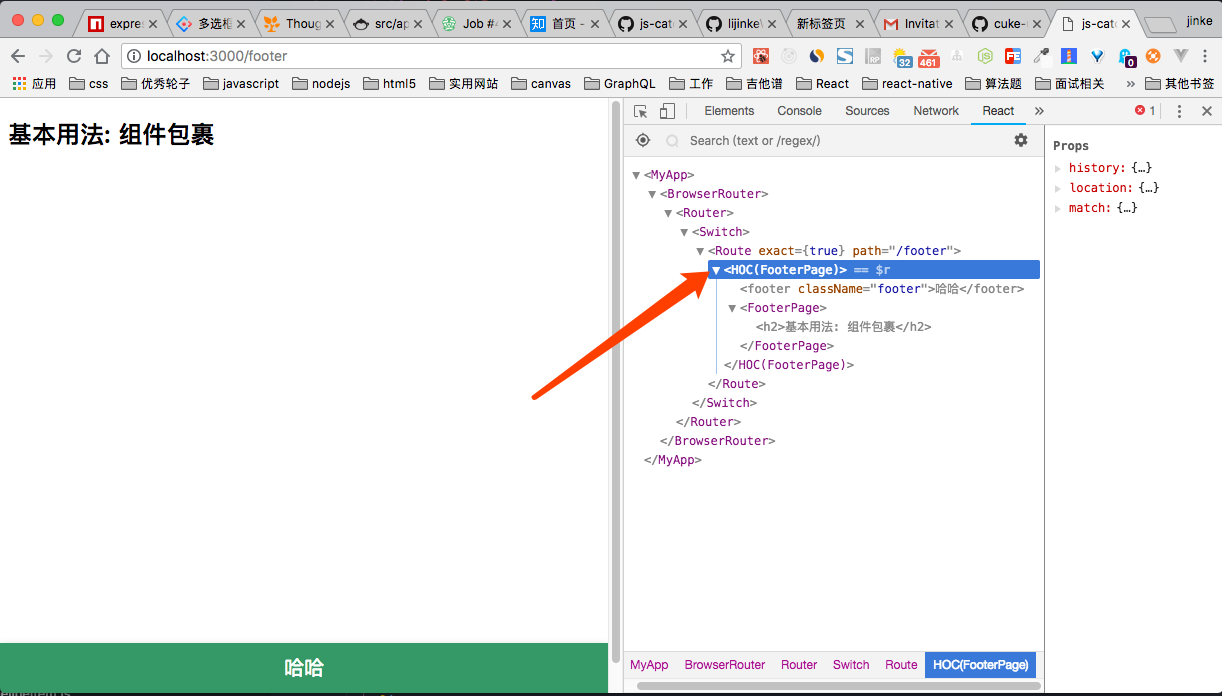
5.1 组件包裹
在原有组件的基础上包一层组件以便于添加一些元素
1 | import React, { Component } from 'react'; |
1 | //Footer.js |
用@ 装饰器的方式使用 高阶组件 第一个参数 是入参,第二个参数 是接受到的包裹组件,然后 返回一个 新的 Componnet, 高阶组件基本都是这种套路
代码很简单 在原有的组件继承上 添加了一个 footer 的标签,displayName 是为了方便调试,因为如果重复使用 这个组件的话,所有的名字 都是 Footer 到时候你都不知道对应的是哪个了,所以加一个名字 方便看
1 | //utils.js |
效果如下
5.2 反向继承与渲染劫持
啥子事反向继承呢?其实就是 继承需要包裹的组件 拿到它的 state 和 props 进行一个判断,添加或者修改
而渲染劫持 同理 因为继承了之后 可以获取需要包裹的组件的生命周期 可以 手动的 判断是否需要 render, 而达到 渲染劫持的 效果
直接上代码,实现一个 自动显示 Loaindg... 的高阶组件
1 | import React, { Component } from 'react'; |
在 页面加载之后 发起一个 fetch 请求 2s(模拟) 后 数据请求完毕,页面正常渲染,在加载完成之前 显示 loading…

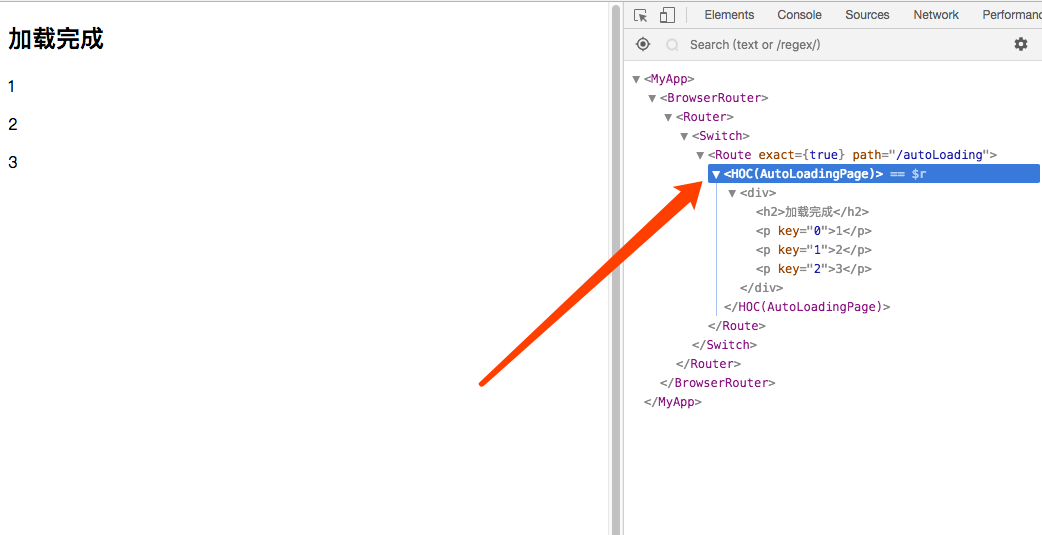
是不是很神奇,在业务逻辑中 并没有手动 setState 去改变 loading 的显示与隐藏,一切尽在 autoLoading 这个高阶组件中
1 | // AutoLoading.js |
高阶组件 接受一个 checkLoading 的函数,函数我们传入 props 和 state, 交给消费者调用,只要其中一个返回 true 就是 显示 Loading ..., 否则则代表数据加载完毕,调用父元素 super.render() 渲染页面,这样一个通用的 加载高阶组件就完成了,再也不用 每个页面手动去显示和隐藏加载效果了
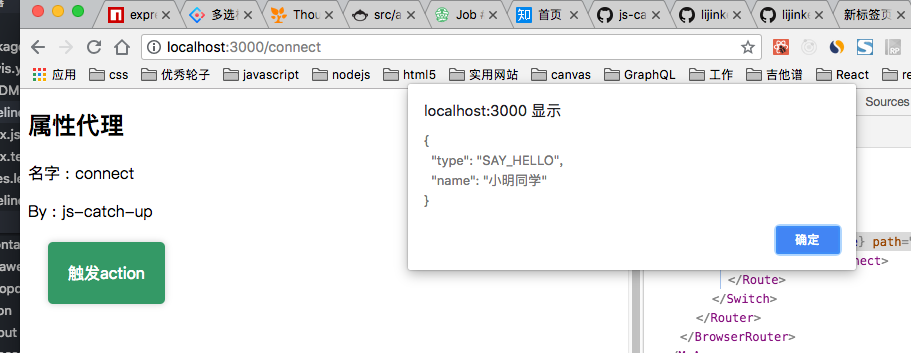
5.3 属性代理 : 实现一个低配版的 connect
平时开发中 使用 React 难免会和 redux 打交道,用了 redux , 全家桶之一的 react-redux 可定再属性不过了,其中有一个 connect 函数 就是经典的高阶组件的实现,通过 connect 之后 我们可以再当前组件 拿到全局的 store 的数据 和 dispatch, 显示我们来尝试实现一个简单的
1 | //Connect.js |
高阶组件接受两个函数
mapStateToProps()mapDispatchToProps()
这里我们模拟一个全局的 store 的 state
1 | const state = { |
模拟一个 action
1 | const dispatch = action => { |
最重要的是这里的,啥子事属性代理,将 当前的 props 传给 被包裹的组件,然后将 消费者 传入的 mapStateToProps 和 mapDispatchToProps 生成的新 props 也传给 被包裹的 组件,这样消费者(被包裹的组件的 props 里面 就有 connect 之后的东西了)
1 | render() { |
如何使用
1 | import React, { Component } from 'react'; |
是不是 和 react-redux 用法一模一样对不对?对你妈个猪脑壳,哈哈 这只是一个低配版的,很多细节没实现,为了便于理解(其实写不来), 比如 观察者模式,数据改变自动同步之类的都没做,主要是理解一下用法
6. 常见问题
- disPlayName 问题
- 高阶组件名字包裹之后需要加一个名字标识 方便调试
- 组件包裹问题
- 由于高阶组件会在当前组件包裹一层 这回带来 传递 props 麻烦的问题 要多传递一次
- 无法获取静态方法
- 高阶组件 可以获取到 被包裹组件的 props 和 state , 但是无法获取 静态方法 需要手动 拷贝 https://github.com/mridgway/hoist-non-react-statics
7. 常见的 第三方库 的 高阶组件
react-hot-loader
1 | import { hot } from 'react-hot-loader'; |
antd-form
1 | import { Form } from 'antd'; |
react-redux
1 | import { connect } from 'react-redux'; |
8. 参考链接
9. 结语
高阶组件感觉也是个双刃剑,用法了 会少很多模板代码,比如 每个 page 都要 connect 可以搞一个高阶组件 统一 connect , 就比较方便,但是 高阶组件会导致 组件多几层嵌套,在组件传值的时候回麻烦一些,加上隐藏了实现细节,如果不是你写的高阶组件,不知道内部逻辑,调试的时候也是一大麻烦是,溜了溜了,下班