1. 前言


作为一个前端,已经离不开 nodejs 相关的社区生态 , npm 提供的丰富的模块 更是方便好用,下面这个命令相信是最常用的

1
npm install [module_name]

那么别人的模块是怎么发布到 npm 供大家使用呢?这里分享一下我的小小的一点经验

2. 注册 npm 账号

访问 https://www.npmjs.com/signup 注册一个 npm 账号
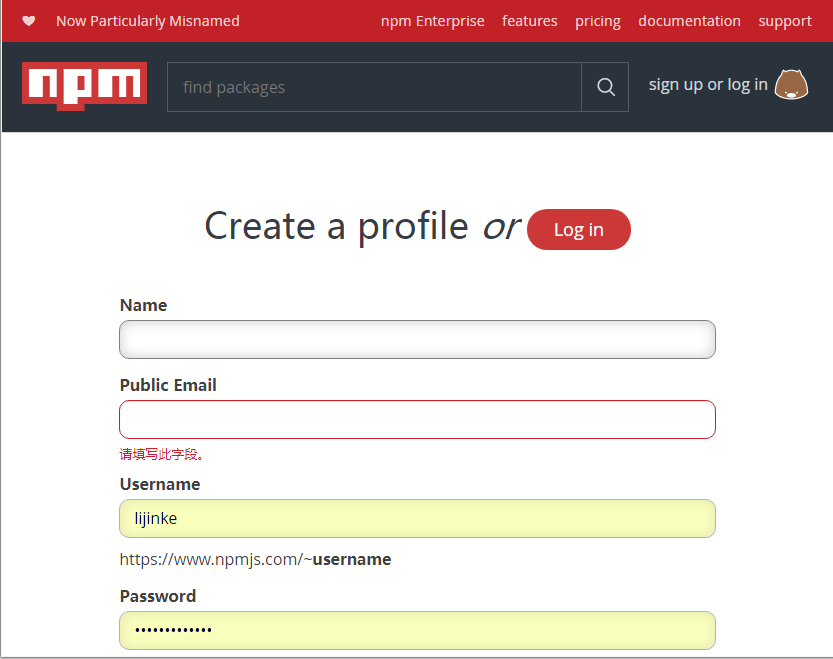


这个不用多说,简单注册一下就可以了

3. 在命令行登录 npm


输入
1
npm login

之后输入 账号密码和邮箱


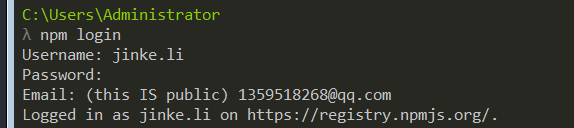
登录成功后 之后的包发布目的地 就是对应的这个地址

可以查看 某个模块的作者

1
2
3
4
npm owner ls antd
afc163 <afc163@gmail.com>
benjycui <benjytrys@gmail.com>
...

比如 antd, 可以看到 偏右大神 等等作者 ^_^

4. 前戏结束,开始正餐

我们这里先已一个 简单 的 webpack 插件 为例,有浅到深首先建立 项目结构
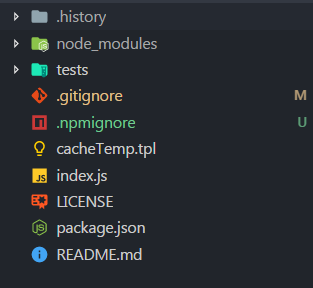


这是最基础的一个文件结构 ,

  • index.js 为我们模块的入口
  • LICENSE 是 许可证 通常为 MIT 即可 不了解的可自行百度
  • package.json 最重要的一个 模块配置文件 关系到模块的发布相关细节
  • README.md 说明文档 可以介绍一下这个模块
  • .gitignore git 提交时 你想忽略的文件列表
  • .npmignore npm 模块发布时 你想忽略的文件列表 列表中的文件不会被发布到 npm 上面
  • tests 单元测试

4.1 编写主程序


编写 index.js

1
2
3
4
5
6
7
8
9
10
11
12
13
14
15
16
17
18
19
20
21
22
23
24
25
26
27
28
29
30
31
32
33
34
35
36
37
38
39
40
41
42
43
44
45
46
47
48
49
50
51
52
53
54
55
56
57
58
59
60
61
62
63
64
65
66
67
68
const fs = require('fs');
const path = require('path');

function AddStaticCachePlugin(options = {}) {
this.cacheTime = options.cacheTime || this.currentTime();
this.template = options.template;
this.publicPath = options.publicPath || '';
this.tempStringConfig = {
date: '{date}',
cssPath: '{cssPath}',
fontsPath: '{fontsPath}',
imagesPath: '{imagesPath}',
jsPath: '{jsPath}',
comments: '{comments}',
};
this.defaultTplName = 'cacheTemp.tpl';
this.defaultCacheName = 'app.appcache';
this.defaultComments = 'add static cache webpack plugin appCache';
this.comments = options.comments || this.defaultComments;
this.tempFilePath = path.resolve(__dirname, this.defaultTplName);
this.tpl =
(this.template && this.readCacheTempFile(this.template)) ||
this.createCacheTempFile();
this.cacheName = options.cacheName || this.defaultCacheName;
this.defaultCacheSavePath = __dirname;
}
AddStaticCachePlugin.prototype.apply = function (compiler) {
compiler.plugin('emit', (compliation, callback) => {
const { assets } = compliation;
const [cssPaths, fontsPath, imagesPath, jsPath] = [[], [], [], []];
for (let filename in assets) {
if (/\.(jpg|jpeg|png|gif|cur|ico)$/i.test(filename)) {
imagesPath.push(filename);
} else if (/\.css$/i.test(filename)) {
cssPaths.push(filename);
} else if (/\.(eot|ttf|svg|woff|woff2)$/i.test(filename)) {
fontsPath.push(filename);
} else if (/\.jsx?$/i.test(filename)) {
jsPath.push(filename);
}
}
const appcache = this.replaceFileData(this.tpl)(this.cacheTime)(
this.transformFilePath(cssPaths),
)(this.transformFilePath(fontsPath))(this.transformFilePath(imagesPath))(
this.transformFilePath(jsPath),
)(this.comments);

console.log('transform cache file finish');
assets[this.cacheName] = {
source: () => appcache,
size: () => appcache.length,
};
console.log(`write cache file finish , fileName => ${this.cacheName}`);
callback();
});
};

(AddStaticCachePlugin.prototype.transformFilePath = function (paths = []) {
if (paths.length <= 1) {
return `${this.publicPath + paths[0]}\n`;
} else {
return paths.reduce((str, next) => {
str += `${this.publicPath + next}\n`;
return str;
}, '');
}
}),
(module.exports = AddStaticCachePlugin);

代码具体细节不重要,这里简单的声明一个 function, 以 es5 的方式 编写,也不需要编译,原型链上挂载两个方法

apply 是 webpack 需要的一个 方法,可以拿到 打包时的上下文,transformFilePath 自定义的一个方法,可以在里面写一些你想实现的东西,最后导出这个 function

1
module.exports = AddStaticCachePlugin

那么使用者 下载模块时 怎么和 index.js 关联呢?这时候就要编写 package.json

4.2 编写 package.json


填写一些必要的信息

1
2
3
4
5
6
7
8
9
10
11
12
13
14
15
16
17
18
19
20
21
22
23
24
25
26
27
28
29
{
"name": "add-static-cache-webpack-plugin", //这个模块的名字
"version": "0.1.6", //当前模块版本 默认最新版本,如下载指定版本 npm i module@x.x
"author": "Jinke.Li", //作者
"license": "MIT", //许可证
"description": "add static HTML5 cache file in yours project", //这个模块简单明了的描述
"main": "index.js", // #1 入口文件,见下文解释
"scripts": { // npm scripts
"test":"mocha --require intelli-espower-loader ./tests" //#2 单元测试
},
"repository": { //github 地址
"type": "git",
"url": "https://github.com/lijinke666/add-static-cache-webpack-plugin.git"
},
"keywords": [ //关键词 可多写几个 便于被搜索
"webpack",
"plugin",
"cache",
"static",
"manifest",
"html5"
],
"devDependencies": { //#3 开发依赖
"debug": "^2.6.8",
"intelli-espower-loader": "^1.0.1",
"mocha": "^3.4.2",
"power-assert": "^1.4.4"
}
}

以上 就是一个 比较基本 的配置了

#1 入口文件

“main”:”index.js” 这里我们指定了 程序的主入口 是 index.js, 也就是当别人下载了这个模块

1
npm i add-static-cache-webpack-plugin
1
const add = require('add-static-cache-webpack-plugin')

此时就直接 require 的 index.js 可以根据实际情况指定 main 字段

#2 单元测试

开源模块,最好还是写一点单元测试,这样使其更加可靠

推荐使用 mocha + power-assert, 写法不用多说,大家都会

1
2
3
4
5
6
7
describe('Test', function () {
describe('#xxx()', () => {
it('xxx', () => {
assert(...xxx);
});
});
});

写好之后 npm run test 即可

#3 开发依赖

很多人都知道 npm i xx -Dnpm i xx -S 会分别安装到 开发环境 和生成环境但如果不是发布模块 装到哪个地方问题其实不大

但是发布模块 就要仔细区分了,如果 模块代码 依赖了其他 第三方模块 就需要 -S, 也就是 dependencies 里面 这样别人下载模块时 会同时下载 这些第三方模块,而测试,调试,其他依赖 装在 devDependencies 里面 , 别人下载模块时 这些模块不会被下载,如果弄错了,会导致你的模块包很大

4.3 发布最后的准备


完善一些细节

完善 .gitignore 和 .npmignore

提交到 git 时 我们不希望出现这些东西

1
2
3
node_modules
npm-debug.log
.history

提交到 .npmignore 时 我们不希望出现这些东西

1
2
node_modules
.history

完善 开源协议

1
2
3
4
5
6
7
8
9
10
11
12
13
14
15
16
17
18
19
20
21
MIT License

Copyright (c) 2016-2018 jinke.Li

Permission is hereby granted, free of charge, to any person obtaining a copy
of this software and associated documentation files (the "Software"), to deal
in the Software without restriction, including without limitation the rights
to use, copy, modify, merge, publish, distribute, sublicense, and/or sell
copies of the Software, and to permit persons to whom the Software is
furnished to do so, subject to the following conditions:

The above copyright notice and this permission notice shall be included in all
copies or substantial portions of the Software.

THE SOFTWARE IS PROVIDED "AS IS", WITHOUT WARRANTY OF ANY KIND, EXPRESS OR
IMPLIED, INCLUDING BUT NOT LIMITED TO THE WARRANTIES OF MERCHANTABILITY,
FITNESS FOR A PARTICULAR PURPOSE AND NONINFRINGEMENT. IN NO EVENT SHALL THE
AUTHORS OR COPYRIGHT HOLDERS BE LIABLE FOR ANY CLAIM, DAMAGES OR OTHER
LIABILITY, WHETHER IN AN ACTION OF CONTRACT, TORT OR OTHERWISE, ARISING FROM,
OUT OF OR IN CONNECTION WITH THE SOFTWARE OR THE USE OR OTHER DEALINGS IN THE
SOFTWARE.

完善 README.md

写一些如何使用 怎么安装,这些必要信息即可

5. 大功告成,发布


首先发布到 github 上

1
2
3
git add .
git commit -m "chore:init"
git push

然后发布到 npm

1
npm publish .

稍等一会 模块发布成功,在 npm 官网查看

https://www.npmjs.com/package/add-static-cache-webpack-plugin

到此,差不多一个发布模块的流程就走完了,接下来就可以使用了

1
npm i add-static-cache-webpack-plugin -S

webpack.config.js

1
2
3
4
5
6
7
8
9
10
11
12
13
14
15
const AddStaticCachePlugin = require('add-static-cache-webpack-plugin')

...

module.exports = {
...
plugins: [
new AddStaticCachePlugin({
tempalte:"", // Not required Default template See the instructions below
cacheName:"jinke.appcache", // Not required Default `app.appcache`
comments:"I am commnets", // Not required Default `add static cache webpack plugin appCache`
publicPath:"/" // Not required Default create temp file in your `webpack.config.js` `output options publicPath`
})
]
};

完美

6. 结语


这只是一个最简单的模块,如果是 React,Es6 的组件模块的话,还要 babel 编译 js, postcss,j,less 编译 less,css, 单页测试也有一点不同,过于复杂,不便于初学,当然,以上也是我个人摸索出来的,肯定也不是很好

但其实我个人这种水平 制造的也只是 垃圾轮子而已 不会有太多人用,出于学习的目的当然还是有一定的好处,天天用别人的,不说写出那样的轮子,但是经过这么一摸索,至少知道了这种东西是怎么来的,也是极好的呀