
1. 前言
之前恶搞了一张朋友的表情包,直接在百度上找了一个在线表情包制作器,突然灵光一闪,要是支持摄像头该多好,方便又快捷 (重点是省手机内存,不用拍照 :) ), 二话不说,开始搬砖
2. 预想的功能点
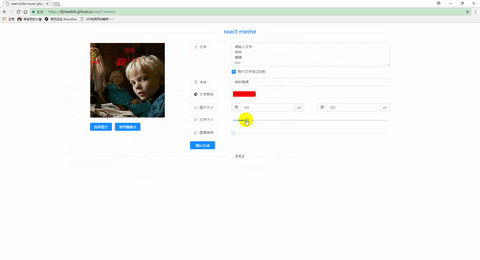
图片支持直接粘贴 和 拖拽图片和文字缩放,支持鼠标滚轮支持图片翻转支持捕捉摄像头画面当素材
3. 撸页面
使用的第三方库
antd宇宙最强 ui 库react-color取色器react-draggle拖拽dom-to-imagedom 节点转成图片
页面 使用 React+ Antd 方便快捷,三下五除二就搞定了
1 | //每一行基本就是这样子 |
支持图片拖拽
1 | dragArea.addEventListener( |
支持 图片 粘贴,这个也很简单 绑定粘贴事件 拿到 event 里面的 data 渲染出来就行了
1 | pasteHandler = (e) => { |
渲染图片
1 | renderImage = file => { |
其他就没啥好说的了,常规的页面布局
4. 生成图片
生成图片 本质上就是 利用 canvas 的 ctx.drawImage(),
绘制文字
1 | const canvas = document.createElement('cavans'); |
懂原理了 其实没必要一行一行这样写了 找到个 现成的 dom-to-image 的库,肥肠的不错,也是开源和组件化得魅力啊,利人利己
调用 api domToimage.toPng() 轻松搞定
1 | drawMeme = () => { |
- MediaStream 实现 摄像头捕捉
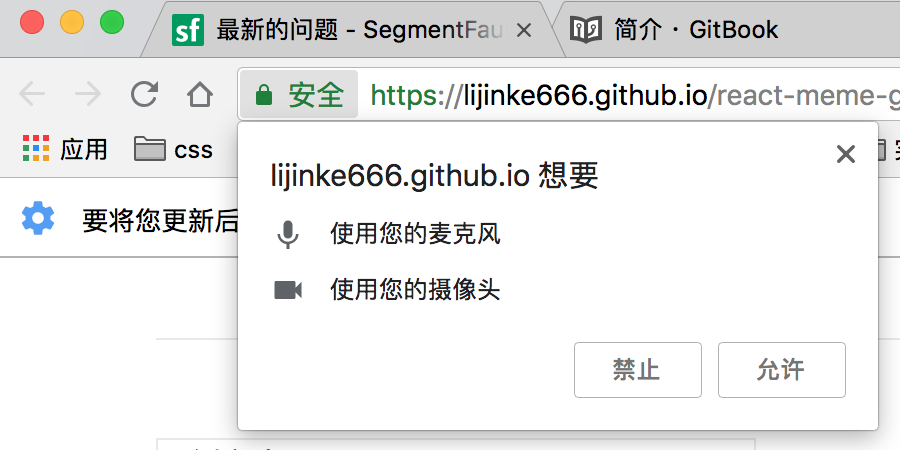
要想拿到 MediaStream, 调用 navigatar.mediaDevices() 即可,如果想研究 webRTC, 这些 API 也是基础,个人不是很感兴趣,就没研究,暂时只用到这个借口
1 | navigator.mediaDevices |
这时页面左上角 会弹出一个提示 问你是不是允许 使用摄像头,同意后 拿到 stream, 否则进入 cath
使用 URL.createObjectURL() 拿到一个临时的 url 链接
然后将 链接 设置成 <video src={临时 URL}/> 调用 video.play()
1 | //jsx |
这时就会看见一个 帅气的脸庞 出现在了屏幕上 !
这时来到了最后一步,截取画面,也很简单 把 video 节点画在 canvas 上,然后 toDataURL() 蹬蹬,搞定
1 | screenShotCamera = () => { |
5. 下载图片
下载图片 基于 HTML5的 download 属性很好实现
1 | const filename = Date.now(); |
然后默认触发一次点击事件 搞定
6. 结语
这样一个支持 摄像头 的 表情包制作器就完成了,这时真的体会到了 npm 强大生态 和 组件化的 好处,也学习到了 各种新 api 的使用!老铁没毛病