1. 前言


曾几何时,躲在角落瑟瑟发抖的我,看着那些大佬们一个个的都有自己的个人网站,博客,我也心痒痒啊,于是下定决心,准备自己搞一个博客或者个人网站,时光匆匆流逝,键盘噼里啪啦,于是,你看到了现在这个样子的个人网站 《李金珂的小屋》 https://www.lijinke.cn

(现在已经变成了 hexo 的模板搭建的,以前的用的阿里云服务器 已经到期没续费了)

2. 前期准备


要搞个人网站,用什么技术栈

  • jekyll
  • github pages
  • coding pages
  • work
  • hexo

太多太多了,但没得啥子特色,虽然方便快捷 但是千篇一律,思来想去

还是自己从 0 开始写吧,但是正在学习 ReactNode.js, 于是前端使用 react 的 全家桶,后端使用 nodejs + mongodb. 功能模块有 聊天,看照片,博文,和自己的介绍

3. 前端部分


3.1 布局篇

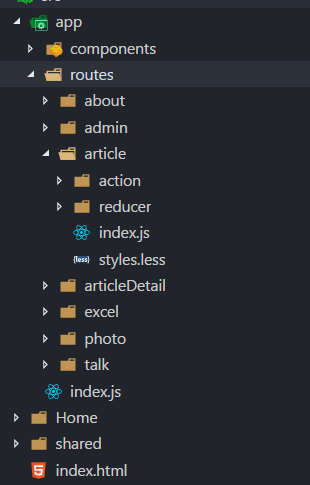
项目架构 在 之前 架构师 seth 的基础上 改了一些,很快就跑起来了,下面就开始写页面了,因为是 react 和 redux 每个路由 都是长这个样子的,每个路由对应自己的 actionreducer. index.js 就是对应的页面,styles.less 是它当前的样式。比较好维护

当时放弃了 ie 的支持。由于是响应式的,所以 pc 和 mobile ui 下 都用的 flex 布局,比如下面这段 css, 很简单快捷的就实现了 pc 时 并排显示,mobile 时 纵向排列 , 其他没什么讲的,都是很简单的一些样式

1
2
3
4
5
6
7
8
9
10
11
12
13
14
//全站配色定义
@primary-color: #31c27c;
@warning-color: #ffbf00;
@error-color: #f04134;
@success-color: #00a854;
@default-color: #d9d9d9;
@disabled-color:rgba(0, 0, 0, 0.25);
@info-color:#49a9ee;
@loading-color:darken(@info-color,10%);
@bg-color:#f7f8fa;
@text-color:rgba(0,0,0,.65);
@border-color:#e8e8e8;
//... 其他的

1
2
3
4
5
6
7
8
9
10
11
12
13
14
15
16
17
18
19
20
21
22
@import "~styles/vars.less";
@import "~styles/mixin.less";

.article-section{
@article-animate-time:.8s;
@ranking-animate-time:.45s;
display: flex;
justify-content: space-around;
@media screen and (max-width:768px){
flex-direction: column-reverse
}
.article-list{
color:#fff;
flex-basis:68%;
@media screen and (max-width:768px){
flex:1;
}
height:auto;
margin:20px 0;
-webkit-backface-visibility: hidden;
-webkit-transform: translate3d(0,0,0);
}

响应式方面就简单的处理了下,差不多都长这样

1
2
3
4
5
6
7
8
9
10
11
12
13
14
15
16
.jinke-modal{
pointer-events: auto;
box-shadow:0 5px 20px 0 rgba(0,34,77,.5);
background-color: #fff;
border-radius: 4px;
width: 520px;
min-height: 200px;
max-height: calc(~"100vh - 48px");
z-index:77;
transform-origin: bottom center;
outline: none;
transform: scale(0);
@media screen and (max-width:768px){
width:90% !important;
}
}

动画差不多都是这样子

1
2
3
4
5
6
7
8
9
10
@keyframes publicTranslateXAnimate{
from{
opacity: 0;
transform: translate3d(-60px,0,0)
}
to{
opacity: 0;
transform: translate3d(0,0,0)
}
}

关于我们使用了一点 3d 的动画,朋友都说眼睛看着疼。..

1
2
3
4
5
6
7
8
9
10
11
@keyframes aboutItemAnimate{
from{
transform: translate3d(0,0,-10000px) rotateX(100deg) rotateZ(20deg)
}
70%{
transform: translate3d(0,0,10000px) rotateZ(20deg);
}
to{
transform: translate3d(0,0,0) rotateX(0)
}
}

3.2 组件篇


既然是 React, 必然离不开组件,由于网站的性质比较简单,用不到什么复杂的组件,大概就分了下面这些组件


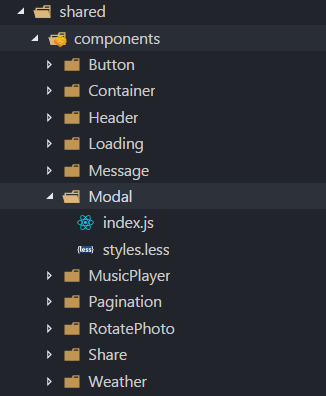
顾名思义,都是一些常规的组件,样式方面 后来 偷看了下 antd 的样式 把它改的 扁平化了一些,更好看了

<Loading/> 就是 页面加载中 显示的那个 全屏的原谅色 李金珂 三个字 svg 的效果 <Weather/> 就是简单的一个 canvas 的下雨

其他唯一有说的意义的是 <Message/> 组件 , 但是 React 16 还没有发布。也没有 传送门 的概念,

当时就在想怎么 做到和 antd 一样 可以 message.success() 这种快速的调用呢?后面通过观察,查资料,知道了大概的做法

首先在 root 节点 挂载一个 容器

1
2
3
4
5
6
7
8
9
10
11
12
13
14
15
16
17
18
19
20
21
22
23
24
25
26
//Root.js
render() {
const { isLoading } = this.state
const { weather } = this.props
return (
<div>
<Loading isLoading={isLoading} />
<Header title="李金珂的小屋" />
{
weather
? <Weather
type={"rain"} // snow 下雪 rain 下雨
maxNum={12} //最大数量
angle={10} //偏移角度
/>
: undefined
}

<MusicPlayer />

{/*消息弹窗放在这里*/}
<div key="jk-message" className="jk-message"></div>
{this.props.children}
</div>
)
}

以前只知道 static 的 属性 不会被继承,但是还有一个作用,即 在外部调用的时 可直接使用这个方

法,也就是 Message.error(), 调用之后 再调用 renderElement 就可以把节点挂载在我们之前设置的节点上了,

网上说的 this.ref.xx 的方法 实在难用至极,对应的如果卸载,即调用 ReactDOM.unmountComponentAtNode() 即可

1
2
3
4
5
6
7
8
9
10
11
12
13
14
15
16
17
18
19
20
21
22
23
24
25
26
27
/**
* static 静态方法 不会被继承 可以直接被类调用
* 所以可以实现 Mesage.info() 这种
*/
static renderElement = (type, content = "提示", duration = 2, onClose) => {
let div = document.createElement('div')
let _message = ReactDOM.render(
<Message
type={type}
content={content}
duration={duration}
onClose={onClose}
/>,
div
)
let dom = document.querySelector(".jk-message").appendChild(div)
_message._container = div
_message._dom = dom
}
static error(content, duration, onClose) {
this.renderElement("error", content, duration, onClose)
}
//移除节点
removeNode = () => {
ReactDOM.unmountComponentAtNode(this._container)
this._dom.remove()
}

另外网站上用的音乐播放器 <MusicPlayer/> 就是 调用 audio 一些 api 操作,发布到了 npm 可独立使用地址 https://github.com/lijinke666/react-music-player

最后使用了 四个第三方的 组件 react-markdown , rc-calendar , share.js, socket-io-clent 分别用在了 文章详情的 渲染 , 文章列表页的搜索 和 分享,聊天。组件的质量和方便程度都不错,伟大的 github 啊 :)

3.4 Redux


页面写的差不多了,就要和 后端交互 拿数据 , 这里用的是 react-redux ,mboxsoga 以后会尝试,

刚开始 学习 redux 的时候觉得好复杂,dispatch action , 然后 又是啥子 reducer, 后面入门了之后发现也就那么回事,store 就基本上是个 全局变量,每个路由 基本 都张这个样子

使用 es7 装饰器 connect 组件

1
2
3
4
5
6
7
8
9
10
11
12
13
14
15
16
17
18
19
20
import { connect } from 'react-redux';
import { bindActionCreators } from 'redux';
@connect(
({ ArticleAction }) => ({
articleData: ArticleAction.lists,
}),
(dispatch) =>
bindActionCreators(
{
getArticleLists,
},
dispatch,
),
)
export default class Article extends React.PureComponent {
//...
componentDidMount() {
this.props.getArticleLists();
}
}

connect 之后 在 props 里面 就拿得到 this.props.getArticleLists 这个方法,然后在挂载周期的时候 调用即可逻辑清晰易维护,但是写起来确实有一点繁琐,所以会出现 avd 之类的解决方案

action

1
2
3
4
5
6
7
8
9
10
11
12
13
import helper from 'libs/helper';
export const ARTICLE_LIST = 'article_list';

export default function getArticleLists(params, callback) {
return async function (dispatch) {
const lists = await helper.getJson('/article/lists', params);
dispatch({
type: ARTICLE_LIST,
lists,
});
callback && callback();
};
}

reducer

1
2
3
4
5
6
7
8
9
10
11
12
13
14
15
16
17
import { ARTICLE_LIST } from '../action';
const nameInitialState = {
lists: [],
};

export default function (state = nameInitialState, action) {
const { type } = action;
switch (type) {
case ARTICLE_LIST:
return {
...state,
lists: action.lists.data,
};
default:
return state;
}
}

后续的页面都是雷同,依葫芦画瓢,三下五除二就解决了。.. 接下来就是后端了

4. 后端部分


4.1 后端搭建


目录结构大致长这样,使用了我自己比较熟悉的 express, 其实个人认为 在 es7 async await nodejs 原生支持,koa(1|2) 其实也没什么优势了
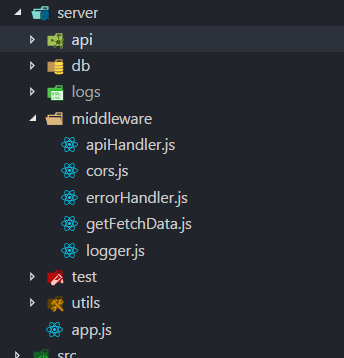


  • api 提供网站需要的一些接口
  • middleware 提供需要的一些中间键
    • apiHandler 包装结果,发送到前端
    • errorHandler 包装错误信息,发送到前端
    • getFetchData express 的 body-parser 模块 解析不了 fetch 传过来的 body. 所有手动接受
    • logger 常规的一些日志输出 (log4js)
  • test 单元测试 推荐一个 power-assets 比较好用
  • utils 一些常用的工具函数
1
2
3
4
5
6
7
8
9
10
11
12
13
14
15
16
17
18
19
20
21
22
23
24
25
26
27
//apiHandler.js
/**
* 统一处理 response 格式
* 路由发送数据 统一用 res.data = xxx
*/

const { HTTP_logger } = require('../utils/logHelper');
const { origin } = require('../../config');

module.exports = function (req, res, next) {
const resData = {
api: req.originalUrl, //请求接口
method: req.method, //请求方式
origin, //来源
result: {
code: 'SUCCESS',
message: '',
},
data: res.data,
};
HTTP_logger.info(
Object.assign(
JSON.stringify({ query: req.query, body: req.body }, resData),
),
);
res.status(200).send(resData);
};
1
2
3
4
5
6
7
8
9
10
11
12
13
14
15
16
17
18
19
20
21
//errorHandler.js
const { origin } = require('../../config');
const { ERROR_logger } = require('../utils/logHelper');

module.exports = function (err, req, res, next) {
const resultData = {
api: req.originalUrl,
method: req.method,
origin,
result: {
code: 500,
message: err.message ? err.message : err,
},
};
ERROR_logger.info(
Object.assign(
JSON.stringify({ query: req.query, body: req.body }, resultData),
),
);
res.status(err.status || 500).send(resultData);
};
1
2
3
4
5
6
7
8
9
10
11
12
13
14
//getFetchData.js
module.exports = function (req, res, next) {
if (req.originalUrl.indexOf('/api/music') !== -1) return next();

let postData = '';
req.on('data', (data) => {
postData += data;
});
req.on('end', () => {
postData = postData && JSON.parse(postData);
req.body = Object.assign(req.body, postData);
next();
});
};

这里如果需要避免 编码不是 utf8 导致 乱码 还应该 用 buffer 转一下。但是在此场景下不需要

其他就和平常了。没什么需要讲的,点赞 , 评论,发布文章,基本都是些 mongodb 的 find() update() create()

文章 api 设计的 人人可以发布文章。所有加了一个需要审核。然后邮件通知审核通过,最后显示在前端上。这里用到了 nodemailer 模块

后端大致依赖的模块

1
2
3
4
5
6
7
8
9
10
11
12
13
14
15
16
17
18
19
20
21
22
23
24
25
const express = require('express');
const path = require('path');
const debug = require('debug')('app');
const compress = require('compression');
const bodyParser = require('body-parser');
const app = express();
const http = require('http');
const https = require('https');
const cors = require('cors');
const url = require('url');
const cookieParser = require('cookie-parser');
const helmet = require('helmet');
const proxy = require('express-http-proxy');
const writeIndex = require('./utils/writeIndex');
const timeOut = require('connect-timeout');
const { host, PORT, socket_port } = require('../config');
const mode = process.env.NODE_ENV || 'DEV';
const { log4js, HTTP_logger } = require('./utils/logHelper');
const history = require('connect-history-api-fallback');
const fs = require('fs');

const HTTPS_CONFIG = {
key: fs.readFileSync(path.resolve(__dirname, '../cert/214289650220185.key')),
cert: fs.readFileSync(path.resolve(__dirname, '../cert/214289650220185.pem')),
};

HTTPS_CONFIG 之前申请了一个阿里云的免费 1 年 https 证书。后来去掉了。对这个网站来言。意义不大

5. 项目部署


经过 无数个周末 和空闲时间 网站的开发基本接近尾声了,接下来就是我比较陌生的一个环境了,也就是项目部署上线由于是前后端分离 所以我在 webpack 打包的时候 做了一下 测试环境 和 生产环境的区分,大致用到的 npm scripts 如下

1
2
3
4
5
6
7
8
9
10
11
12
13
14
15
16
17
18
{
"scripts": {
"start": "npm run dev",
"clean": "rimraf public/static && rimraf public/index.html && rimraf public/lijinkeWeb.appcache && npm run clean-info",
"clean-info": "node -e \"console.log('=======[ Static Folder Delete Success ]======== :)');\" ",
"prod-server": "npm run build && set debug=*,-not_this && cross-env NODE_ENV=PROD pm2 restart ./process.json",
"dev-server": "set debug=*,-not_this && cross-env NODE_ENV=DEV nodemon server.js",
"build": "npm run clean && webpack --env.mode=PROD --progress --config webpack.config.js",
"dev": "npm run clean && webpack-dev-server --config webpack.config.js",
"update-cache": "node -e \"console.log(' update cache file start ');\" && node writeCache.js",
"upgrade": "yarn upgrade",
"stop": "pm2 stop all",
"server": "cross-env NODE_ENV=PROD pm2 restart ./process.json",
"connect-db": "mongod --dbpath ./db/lijinkeWeb",
"restore": "mongorestore -d lijinkeWeb --drop ./db/lijinkeWeb",
"dump": "mongodump -d lijinkeWeb -o ./db"
}
}

然后在 webpack.config.js

1
2
3
4
5
6
7
8
9
10
11
12
13
14
15
16
17
module.exports = (env) => {
//env 是 npm script 运行 webpack 时传进来的 判断是否是开发环境
const mode = (env && env.mode) || "DEV"
output: {
path: path.resolve(__dirname, "public/static"),
filename: mode === "DEV"
? "js/[name].js"
: "js/[name].[chunkhash:8].js",
chunkFilename: mode === "DEV"
? "js/[name]Chunk.js"
: "js/[name]Chunk.[chunkhash:8].js",
publicPath: mode === "DEV"
? `${host}:${dev_port}/`
: "/static/"
},
// ... 其他骚操作
}

这样 在 public 的 static 就是我们的打包后的前端文件了,之后 设置 express 的静态地址为它即可

1
app.use(express.static(`${__dirname}/../public`)); //设置静态资源目录

最后 运行一下这个命令 打包完成之后然后启动 node 服务 项目就跑起来

1
npm run prod-server

虽然在本地流程已经搞定了 但是在服务器上又是另外一码事,买域名,租云服务器,导入数据库,装 git. 这些 没接触的时候觉得没啥,真的自己整的时候 头皮发麻。各种问题都来了。还在 在朋友的帮助下一一都解决了,

印象比较深刻的是 服务器上 mongod --dbpath ./xxx 启动之后 就关机了 发现数据没了,后来才知道 mongodb 服务器掉了 , 后面才知道 要加一个 fork 让他以守护进程的方式,才行

同理,启动 node 服务也是如此,平时都是 node xx.js . 但是在服务器上也是需要 守护进程的方式 启动,

于是 使用了 pm2 这个开源模块,它使用了 集群 等原生 node 模块 实现了负载均衡,宕机重启,进程守护,超级好用,如果自己实现一个 简单的守护进程?后面学习了一下,没我想得那么难,大致就是 开一个 process 然后用这个 process 启动一个 子进程,执行 setsid 然后杀死这个 process 然后这个 子进程就是守护进程了

1
2
3
4
5
6
7
8
//https://cnodejs.org/topic/57adfadf476898b472247eac
const spawn = require('child_process').spawn;

const p = spawn('node', ['b.js'], {
detached: true,
});
console.log(process.pid, p.pid);
process.exit(0);

最后经过一系列坑 和 不熟悉导致的 低级问题。反反复复的调试,网站终于上线了 !!!

6. 结语

一个人搞定一个网站说容易也容易,说难也难容易在 不想懂细节,懂实现,模板一套,插件一用,ctrl+cv 分分钟搞定难在 从无到有 的 每一个细节,原理,调试 bug 的头皮发麻,调通 bug 的独自窃喜,实现一个功能的膨胀炫耀难在 周末空余 深夜撸码的 疲倦与兴奋难在 键盘按下弹起 却无他人听到 用心做的东西却无人分享

有时反思自己,仿佛对什么也不在意,对什么也提不起兴趣,吉他也越练越少,笑容也越来越少每天疲倦的 上班下班 却不知道为什么疲倦,除了写代码,打游戏 好像 也没有什么能让我兴奋的东西我真他妈的可悲